Blush placement: How to lift and sculpt your face with blush
Blush has moved far beyond adding a little colour to the cheeks.
Placed well, it can lift the face, soften angles, create structure, and bring warmth exactly where you want it. In some cases, it can even do what people once relied on contour for.
That’s why blush placement matters just as much as shade or formula. In this guide, we’re breaking down how placement changes the effect of blush, how techniques like blush blocking and blush stacking fit in, and how to apply blush with more intention — whether you want soft everyday lift or a more sculpted look.

Why blush placement matters more than the product itself
A beautiful blush can only do so much if it’s sitting in the wrong place.
Placement determines whether blush lifts, widens, softens, sculpts, or pulls the face downward. It changes how your features read.
Think of blush as directional. It doesn’t just add colour; it guides the eye.
- Placed high and swept upward, it can create lift.
- Placed lower and more horizontal, it can add softness or width.
- Placed strategically beneath the cheekbone, it can create dimension.
The formula matters too, but placement is what makes the technique work.

How blush placement changes the shape of your face
For lift
- Apply blush higher on the cheekbone and blend upward toward the temples. This draws the eye up and gives a more elevated effect.
For sculpting
- Use a deeper blush tone slightly beneath the cheekbone and diffuse upward. This is where contour blush placement comes in.
For softness
- Bring blush slightly inward toward the apples of the cheeks for a rounder, fresher effect.
For width
- A more horizontal placement can add balance to longer face shapes.

Blush placement by face shape
Oval face
- Most placements work well here. A classic high-cheek placement blended toward the temples enhances natural balance.
Round face
- Keep blush high and lifted. Avoid placing it too centrally on the apples of the cheeks, which can emphasise roundness.
Heart-shaped face
- Place blush slightly lower and diffuse outward to bring balance to the lower half of the face.

Blush placement by face shape
Square face
- Use a soft upward sweep across the cheekbones to soften angular structure.
Long face
- Try a more horizontal placement across the cheeks to add width and break up length.

What is contour blush placement?
Contour blush placement uses blush (rather than traditional contour) to create depth and shape.
Instead of placing blush only on the highest part of the cheek, you position it slightly beneath the cheekbone and blend upward. The effect is softer than traditional contour but still sculpting.
This works particularly well with deeper rose, terracotta, berry, or muted tones that have enough depth to create dimension.
With liquid blush:
- Cream and liquid formulas give precision. Tap product beneath the cheekbone, then soften the edges rather than diffusing the whole shape away.
With powder blush:
- Use an angled blush brush to place product with control, then blend upward with a light hand.

What is blush blocking
Blush blocking is a more intentional placement technique where blush is applied in a defined shape rather than diffused everywhere.
Think concentrated placement with softened edges. Unlike traditional blush placement, where colour often melts out gradually, blush blocking keeps more structure.
Examples include:
- High blocks across the outer cheekbones for lift
- Draped placement extending toward the temples
- Soft colour carried slightly across the nose for a sun-flushed effect
The key is precision first, blending second.

Blush stacking, and how to layer correctly
Blush stacking means layering formulas to build dimension and longevity.
Typically:
- Apply cream or liquid blush first
- Layer powder blush over the same placement
- Build softly rather than over-blending between steps
The liquid creates the base flush. The powder adds intensity, softness, and wear.
Done well, stacked blush looks more dimensional than either formula alone.

Cream vs powder blush placement techniques
Cream and liquid blush
Best for:
- Blush blocking
- Contour blush placement
- Skin-like finishes
- Precision placement
Cream formulas let you place colour exactly where you want it before diffusing the edges.
Powder blush
Best for:
- Soft-focus placement
- Building gradually
- Setting cream underneath
- More diffused sculpting
Powder often gives a little more forgiveness if you prefer to build slowly.

Common blush placement mistakes to avoid
Applying blush too low
- Blush placed too far down can visually drag the face.
- As a general rule, keep placement at or above the cheekbone unless intentionally using a lower placement for balance.
Blending too far outward
- Over-blending can erase the shape you were trying to create.
Using too much product at once
- Especially with liquids, start smaller than you think.
Copying placement without considering face shape
- A placement that lifts one face may flatten another.
Not adapting placement to your base
- Very emollient blush over a heavy base can shift if layered incorrectly.

How to adapt blush placement for everyday makeup
For everyday wear, simplify.
A high cheek placement softly blended toward the temples works on most faces and gives an effortless lifted effect.
For extra dimension:
- Add a touch more blush slightly higher for lift
- Layer powder over cream for subtle stacking
- Keep intensity soft and placement intentional
Often, less product in the right place does more than more product applied without structure.
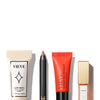
Building your best blush look with VIEVE
Technique matters, but so does using formulas that support the effect you’re trying to create.
A liquid or cream blush can be ideal for precision placement and blush blocking. A powder blush can add softness, buildability, and layered dimension.
Used together, they allow you to create everything from soft lift to more sculpted blush placement.
FREQUENTLY ASKED QUESTIONS
What is the best blush placement for lifting the face?
What is the best blush placement for lifting the face?
The best blush placement for lifting the face is high on the cheekbone, sweeping diagonally upward toward the temples. The upward direction draws the eye in an upward direction. Avoid applying blush too low or horizontally, as this can create a heavier, downward-pulling effect.
How do you use blush for contour?
How do you use blush for contour?
To use blush for contour, apply a deeper-toned blush just beneath the cheekbone and blend upward. This creates shadow and dimension in the hollow of the cheek, sculpting the face similarly to a traditional contour product but with a flush of colour rather than a flat brown or grey shade. A deeper terracotta, berry, or plum blush tends to work best for this technique.
What is blush stacking in makeup?
What is blush stacking in makeup?
Blush stacking is the technique of layering different blush formulas (typically a liquid or cream followed by a powder) to build depth and longevity. The liquid goes on first to create a natural flush, and the powder is applied on top to intensify the colour and help it last throughout the day. When done correctly, stacked blush looks more dimensional and skin-like than a single formula applied alone.
Where should blush go for different face shapes?
Where should blush go for different face shapes?
Placement varies depending on face shape. For round faces, apply high on the cheekbone, sweeping upward to create length and lift. For heart-shaped faces, place blush lower on the cheeks to add balance to the lower half of the face. For square faces, use a soft upward sweep across the cheekbone to soften angles. For long faces, apply blush horizontally to add width. Oval faces have the most flexibility and can work with most placement approaches.
Can blush replace bronzer or contour?
Can blush replace bronzer or contour?
Yes, in many cases it can. Using a deeper-toned blush placed beneath the cheekbone, a technique known as contour blush placement, can create the sculpting and depth effect typically associated with contour products. It will not replicate the cooler, grey-brown tone of a traditional contour, but it creates dimension with the added benefit of colour. Many people find it a more wearable, natural-looking alternative, particularly for everyday makeup.